ONE RESCUER
|
ANKLE PULL
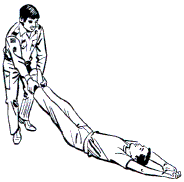 |
The ankle pull is the fastest method for moving a victim a short distance over a smooth surface. This is not a preferred method of patient movement.
- Grasp the victim by both ankles or pant cuffs.
- Pull with your legs, not your back.
- Keep your back as straight as possible.
- Try to keep the pull as straight and in-line as possible.
- Keep aware that the head is unsupported and may bounce over bumps and surface imperfections.
|
SHOULDER PULL
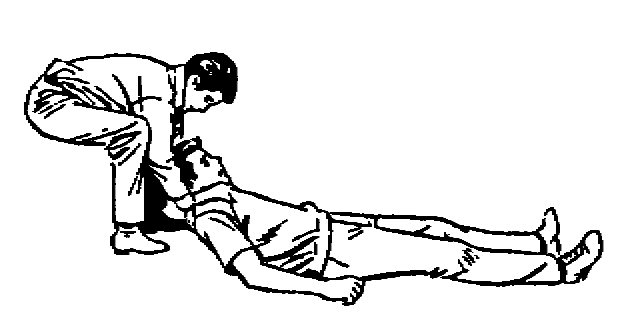 |
The shoulder pull is preferred to the ankle pull. It supports the head of the victim. The negative is that it requires the rescuer to bend over at the waist while pulling.
- Grasp the victim by the clothing under the shoulders.
- Keep your arms on both sides of the head.
- Support the head.
- Try to keep the pull as straight and in-line as possible.
|
BLANKET PULL
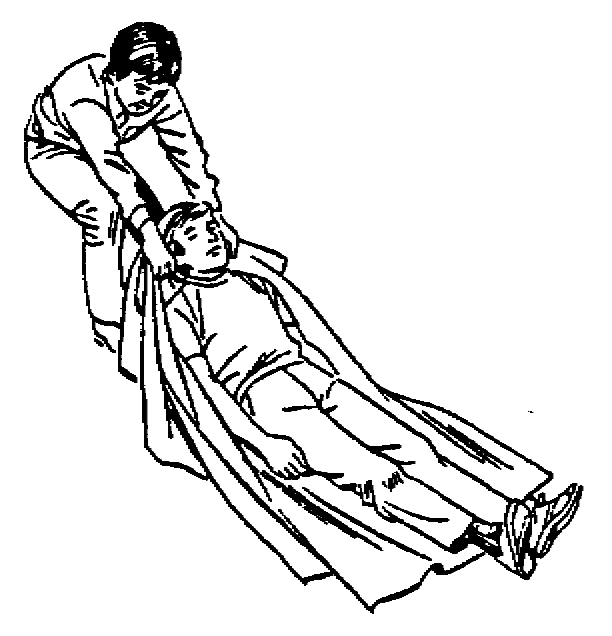 |
This is the preferred method for dragging a victim.
- Place the victim on the blanket by using the “logroll” or the three-person lift.
- The victim is placed with the head approx. 2 ft. from one corner of the blanket.
- Wrap the blanket corners around the victim.
- Keep your back as straight as possible.
- Use your legs, not your back.
- Try to keep the pull as straight and in-line as possible.
|
ONE-PERSON LIFT
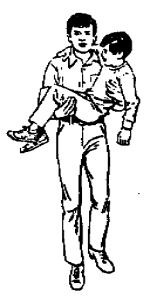 |
This only works with a child or a very light person.
Place your arms under the victim’s knees and around their back. |
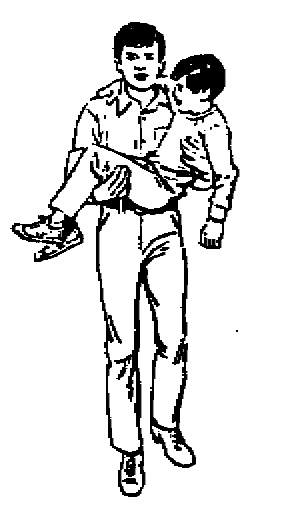
FIREFIGHTER CARRY
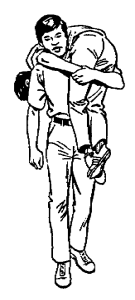 |
This technique is for carrying a victim longer distances. It is very difficult to get the person up to this position from the ground. Getting the victim into position requires a very strong rescuer or an assistant.The victim is carried over one shoulder.
The rescuer’s arm, on the side that the victim is being carried, is wrapped across the victim’s legs and grasps the victim’s opposite arm. |
PACK-STRAP CARRY
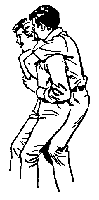 |
When injuries make the firefighter carry unsafe, this method is better for longer distances than the one-person lift.
- Place both the victim’s arms over your shoulders.
- Cross the victim’s arms, grasping the victim’s opposite wrist.
- Pull the arms close to your chest.
- Squat slightly and drive your hips into the victim while bending slightly at the waist.
- Balance the load on your hips and support the victim with your legs.
|
TWO RESCUERS
|
HUMAN CRUTCH/TWO-PERSON DRAG
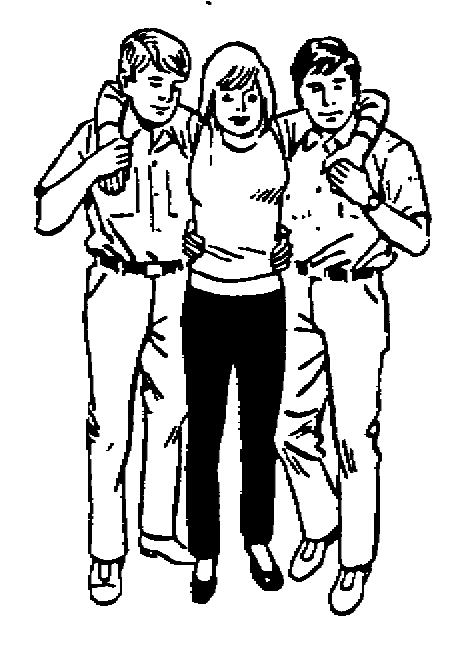 |
For the conscious victim, this carry allows the victim to swing their leg using the rescuers as a pair of crutches.For the unconscious victim, it is a quick and easy way to move a victim out of immediate danger.
- Start with the victim on the ground.
- Both rescuers stand on either side of the victim’s chest.
- The rescuer’s hand nearest the feet grabs the victim’s wrist on their side of the victim.
- The rescuer’s other hand grasps the clothing of the shoulder nearest them.
- Pulling and lifting the victim’s arms, the rescuers bring the victim into a sitting position.
- The conscious victim will then stand with rescuer assistance.
- The rescuers place their hands around the victim’s waist
- For the unconscious victim, the rescuers will grasp the belt or waistband of the victim’s clothing.
- The rescuers will then squat down.
- Place the victim’s arms over their shoulders so that they end up facing the same direction as the victim.
- Then, using their legs, they stand with the victim.
- The rescuers then move out, dragging the victim’s legs behind.
|
FOUR-HANDED SEAT
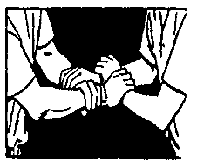 
|
This technique is for carrying conscious and alert victims moderate distances. The victim must be able to stand unsupported and hold themselves upright during transport.
- Position the hands as indicated in the graphic.
- Lower the seat and allow the victim to sit.
- Lower the seat using your legs, not your back.
- When the victim is in place, stand using your legs, keeping your back straight.
|
TWO-HANDED SEAT
 |
This technique is for carrying a victim longer distances. This technique can support an unconscious victim.
- Pick up the victim by having both rescuers squat down on either side of the victim.
- Reach under the victim’s shoulders and under their knees.
- Grasp the other rescuer’s wrists.
- From the squat, with good lifting technique, stand.
- Walk in the direction that the victim is facing.
|
CHAIR CARRY
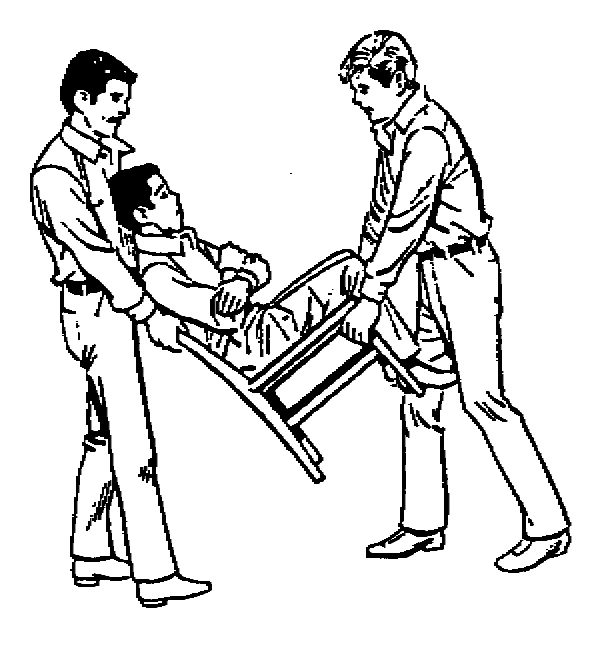 |
This is a good method for carrying victims up and down stairs or through narrow or uneven areas.
NOTE: The chair used should be a sturdy one. Don’t use aluminum beach chairs, resin patio chairs, swivel chairs, or lightweight folding chairs.
REMEMBER: Chairs with wheels can be used to roll the victim, but should not be used for a carry.
- Pick the victim up and place them or have them sit in a chair.
- The rescuer at the head grasps the chair from the sides of the back, palms in.
- The rescuer at the head then tilts the chair back onto its rear legs.
- For short distances or stairwells, the second rescuer should face in and grasp the chair legs.
- For longer distances, the second rescuer should separate the victim’s legs, back into the chair and, on the command of the rescuer at the head, both rescuers stand using their legs.
|
IMPROVISED STRETCHER
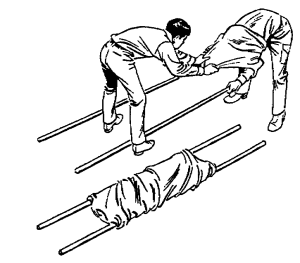 |
This technique requires two poles/pipes strong enough to support the victim’s weight and at least two shirts.
REMEMBER: Rescuers should not give up clothing if, for any reason, this might affect their health, welfare, or reduce their effectiveness.
- While the first rescuer is grasping the litter poles, the second rescuer pulls the shirt off the head of rescuer one.
- All buttons should be buttoned with the possible exception of the collar and cuffs.
- The rescuers then reverse the procedure and switch sides.
|
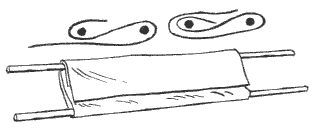
BLANKET STRETCHER
 |
This technique requires two poles and a blanket.
- Place the blanket down on the ground.
- Place one pole approx. 1 foot from the middle of the blanket.
- Fold the short end of the blanket over the first pole.
- Place the second pole approx. 2 feet from the first (this distance may vary with victim or blanket size).
- Fold both halves of the blanket over the second pole.
|
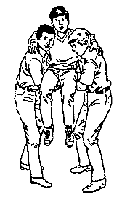
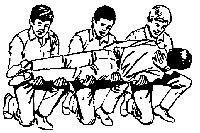
THREE OR MORE RESCUERS
|
HAMMOCK CARRY
  |
Three or more rescuers get on both sides of the victim. The strongest member is on the side with the fewest rescuers.
- Reach under the victim and grasp one wrist on the opposite rescuer.
- The rescuers on the ends will only be able to grasp one wrist on the opposite rescuer.
- The rescuers with only one wrist grasped will use their free hands to support the victim’s head and feet/legs.
- The rescuers will then squat and lift the victim on the command of the person nearest the head, remembering to use proper lifting techniques.
|
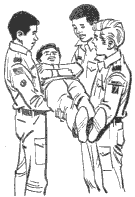
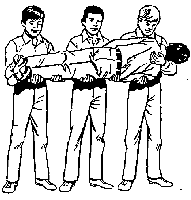
THREE-PERSON CARRY OR STRETCHER LIFT
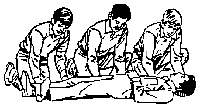   |
This technique is for lifting a patient into a bed or stretcher, or for transporting them short distances.
- Each person kneels on the knee nearest the victim’s feet.
- On the command of the person at the head, the rescuers lift the victim up and rest the victim on their knees.
If the patient is being placed on a low stretcher or litter basket:
On the command of the person at the head, the patient is placed down on the litter/stretcher.
If the victim is to be placed on a high gurney/bed or to be carried:
At this point, the rescuers will rotate the victim so that the victim is facing the rescuers, resting against the rescuers’ chests.
- On the command of the person at the head, all the rescuers will stand.
- To walk, all rescuers will start out on the same foot, walking in a line abreast.
|